As a result of the pandemic, most of our interactions now occur virtually, and for Hostos students, faculty and staff, the majority of academic and non-academic “meetings” occur via Zoom.
Therefore, it is important to keep in mind certain settings and considerations for your Zoom meetings to avoid any undesirable participants or their actions that could not only be disruptive, but also have other negative impacts on your other attendees.
Always do the following for your Zoom meetings
- Use the “Waiting Room” and/or “Registration” feature to ensure only Approved participants can join your meetings
- Require a passcode for your meetings
- DO NOT publish your meeting link with passcode to public websites/social media accounts
- Do “Generate a random unique meeting ID” for each of your scheduled meetings, especially those which are non-recurring/not with the same participants (do not use your Personal Meeting ID (PMI) for all your meetings) – this prevents someone who should not be in a particular meeting from joining that meeting
Select your meeting settings. Note that some of these options might not be available if they were disabled and locked to the off position at the account or group level.
- Topic: Enter a topic or name for your meeting.
- Date & Time:
- Start: Select a date and time for your meeting. You can start your meeting at any time before the scheduled time. You can also manually enter any time. For example, you can enter 15 in the minutes field to schedule a time with a 15-minute increment.
- Time Zone: By default, Zoom will use your computer's time zone. Click the drop-down menu to select a different time zone.
- Recurring meeting: Choose if you would like a recurring meeting (the meeting ID will remain the same for each session).
- Meeting ID
- Generate Automatically: Generate a random unique meeting ID.
- Personal Meeting ID*: Use your Personal Meeting ID.
- Consider using “authenticated users only” especially if you know your attendees/participants should only be Hostos participants who would have to login with their email/password to join your meeting
User
To enable only authenticated users can join meetings for your own use:
- Sign in to the Zoom web portal.
- In the navigation panel, click Settings.
- Under the Security section, verify that Only authenticated users can join meetings is enabled.
- If the setting is disabled, click the toggle to enable it. If a verification dialog displays, click Turn On to verify the change.

References
Scheduling meetings 
Authentication Profiles for meetings and webinars 
Keep the following in mind
- In Zoom “Meetings”, all participants can potentially display their video and audio; there is no way to “mute all” or “stop video” for all participants
- If you want to ensure no participants can “share” their screen, etc. then make sure to restrict “Who Can Share?” to the Host only (Note: this doesn’t prevent them from doing something in their own video, it only prevents them from sharing with all the other participants in the main meeting window)
To prevent participants from screen sharing:
- In the host controls, click the arrow
 next to Share Screen
  and click Advanced Sharing Options.
- Under Who can share? choose Only Host.
- Close the window.
- If you are planning to have an online Broadcast event (e.g. town hall, guest speaker series, etc.), you should use the Webinar feature instead of a Meeting. The Webinar automatically blocks video/audio for any attendee who is not a pre-approved Panelist/speaker. If you need access to this feature for an event, please contact the IT Department at itjobrequest@hostos.cuny.edu at least 2 weeks prior to your planned event and do not send any Zoom meeting links until your access has been confirmed
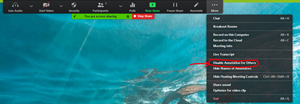
- By default, if you “Share” your screen/content in a Meeting, participants can ANNOTATE over your content which then other attendees will see. Unfortunately, this also includes undesirable/offensive content. To prevent this, you will need to disable Annotation after you start sharing. This option can be found in the top floating menu and by clicking on the “More…” to see the drop down as seen below:

Reference
Managing participants in a meeting 
What to do if you have an undesirable participant or content?
- Take a screenshot of the behavior/participant name and send it to itjobrequest@hostos.cuny.edu and, if offensive/dangerous, include publicsafety@hostos.cuny.edu
- You can “Dismiss” (REMOVE) that participant from the meeting, or SUSPEND PARTICIPANT ACTIVITIES – these can all be accomplished by right-clicking on the attendees name/video
- You can also put a participant “On Hold” essentially suspending their audio/video – but this is only available if you do NOT have the Waiting Room enabled
- If the link was publicly shared, and the undesired participants try to connect with alternate ID’s, you may need to END (stop) the meeting, create a new meeting link and share with the desired attendees
The IT Department offers workshops on how to effectively and securely use Zoom. You can also view some of the Zoom “How To’s” via their website here: